Angular Dependency Injection — One Service, Multiple Implementations

I am an enthusiastic software developer focusing on C#, .NET, Asp.NET, Azure and Angular.
In this post we will learn what is dependecy injection and how to inject multiple implementations of one service into a component.
What Is Dependency Injection?
By Wikipedia, dependency injection is a software design pattern that implements inversion of control for resolving dependencies. A dependency is an object that can be used (a service). An injection is the passing of a dependency to a dependent object (a client) that would use it.
The practice of dependency injection is made possible by following the dependency inversion principle. Dependency inversion is a key part of building loosely coupled applications, since implementation details can be written to depend on and implement higher-level abstractions, rather than the other way around. The resulting applications are more testable, modular, and maintainable as a result.
In Angular, dependencies are typically services, but they also can be values, such as strings or functions. An injector for an application instantiates dependencies when needed, using a configured provider of the service or value.
Creating an injectable service
Creating services in Angular can be done using Angular CLI or just adding a new file in the project. The advantage of using Angular CLI is having everything done and ready to be used.
This is the Angular CLI command to generate a new service.
ng generate service products/product
After the command you sould have your ProductService like this:
import { Injectable } from '@angular/core';

@Injectable({
  providedIn: 'root'
})
export class ProductService {

  constructor() { }
}
The @Injectable() decorator specifies that Angular can use this class in the DI system. The metadata, providedIn: 'root', means that the ProductService is visible throughout the application.
If you decide to not use Angular CLI command to create your services, remember that you will need to add the decorator @Injectable().
Injecting services
To inject a service as a dependency into a component or into an other service is very easy, you just need to add a constructor argument with the type of the service that you want to use.
First of all, let's create a new component using Angular CLI.
ng generate component products
After creating the component we will add the ProductService to it. The following code is the Product component after the dependecy to the service was added.
import { Component, OnInit } from '@angular/core';
import { ProductService } from './product.service';

@Component({
  selector: 'app-products',
  templateUrl: './products.component.html',
  styleUrls: ['./products.component.css']
})
export class ProductsComponent implements OnInit {

  constructor(private productService: ProductService) { }

  ngOnInit(): void {
  }

}
In runtime the component will receive the instance of productService ready to be used.
The example
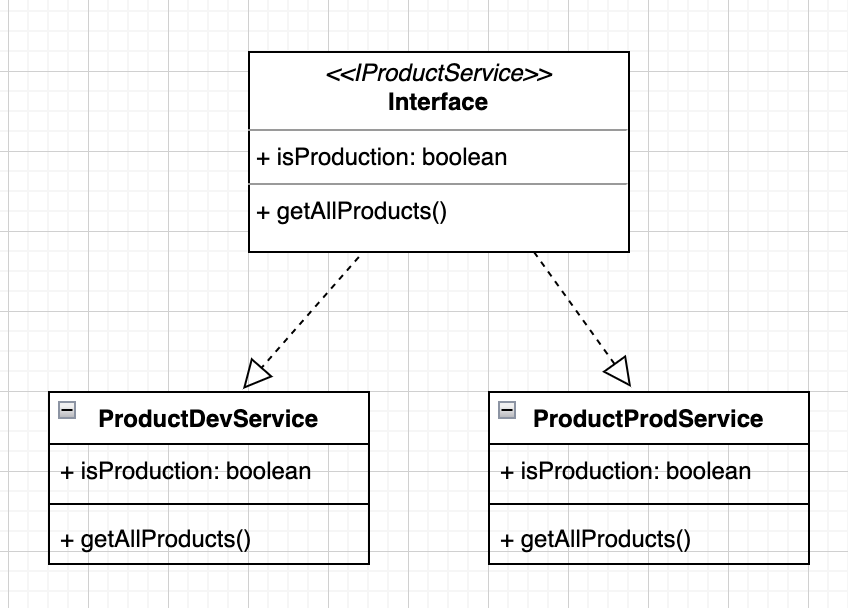
Let's picture the situation when we need a different implementation of ProductService running in dev and another running in production.
So the idea is to have an Interface of the service and different implementations of it. The Class Diagram represents the idea of what we want to implement.
To have this solution in place we need to use the dependency injection differently than we've used it before.
Injecting multiple services
Angular has dependency providers that allow dependency injection not only for classes but also for other values such as boolean, string, date, and objects.
We could have chosen useFactory for this implementation. The useFactory provider key lets us create a dependency object by calling a factory function. With this approach we would be responsible to create the instance of the service that needs to be injected.
Using InjectionToken will allow us to inject an interface, callable type, array of parameterized type. Our component will receive an array of the IProductService, that in runtime will contain the instance of the services ProductProdService and ProductDevService.
The useClass provider key lets us create and return a new instance of the specified class, so we will use it with InjectionToken. We can use this type of provider to substitute an alternative implementation, for example, implement a different strategy or extend the default class.
Let’s code
First we will create the interface IProductService and the services ProductProdService and ProductDevService.
import { Injectable, InjectionToken } from '@angular/core';

export const productServiceToken = new InjectionToken<ProductService>("ProductService");

export interface ProductService {

  isProduction: boolean;

  getAllProducts(): void;

}
The responsibility of InjectionToken class here is to ensure that the token is unique, this way another developer won’t be able to create another token with the same value.
import { Injectable } from '@angular/core';
import { ProductService } from './product.service';

@Injectable({
  providedIn: 'root'
})
export class ProductProdService implements ProductService {

  constructor() { }

  isProduction = true;

  getAllProducts(): void {
    console.log('getting data from Prod');
  }
}
import { Injectable } from '@angular/core';
import { ProductService } from './product.service';

@Injectable({
  providedIn: 'root'
})
export class ProductDevService implements ProductService {

  constructor() { }
  isProduction = false;

  getAllProducts(): void {
    console.log('getting data from Dev');
  }
}
The next step is to configure the dependency providers so this way both implementations of our service can be injected into our component. The following code is from app.module.ts . You can see that was used productServiceToken to inform Angular which service is being registered, useClass is to register which classes will be used and multi is because we have multiple dependencies for a inject token.
import { NgModule } from '@angular/core';
import { BrowserModule } from '@angular/platform-browser';

import { AppRoutingModule } from './app-routing.module';
import { AppComponent } from './app.component';
import { ProductProdService } from './products/product-prod.service';
import { productServiceToken } from './products/product.service';
import { ProductDevService } from './products/product-dev.service';
import { ProductsComponent } from './products/products.component';

@NgModule({
  declarations: [
    AppComponent,
    ProductsComponent
  ],
  imports: [
    BrowserModule,
    AppRoutingModule
  ],
  providers: [
    {
      provide: productServiceToken,
      useClass: ProductDevService,
      multi: true,
    },
    {
      provide: productServiceToken,
      useClass: ProductProdService,
      multi: true,
    }
  ],
  bootstrap: [AppComponent]
})
export class AppModule { }
Now our component is ready to receive an array of IProductService in the constructor and we can define which service it will use. For this example, one service will be used in Dev and the other in Prod.
import { Component, Inject, OnInit } from '@angular/core';
import { ProductService, productServiceToken } from './product.service';
import { environment } from 'src/environments/environment';

@Component({
  selector: 'app-products',
  templateUrl: './products.component.html',
  styleUrls: ['./products.component.css']
})
export class ProductsComponent implements OnInit {
  private productService: ProductService;
  constructor(@Inject(productServiceToken) private productServices: ProductService[]) {

      this.productService = this.getService();
  }

  ngOnInit(): void {
    this.productService.getAllProducts();
  }

  getService(): ProductService {
    return this.productServices.find(p=> p.isProduction == environment.production)!;
  }

}
Wrapping Up
You can find the full code on my GitHub