Using Rate Limiting in Asp.Net Core Minimal APIs

I am an enthusiastic software developer focusing on C#, .NET, Asp.NET, Azure and Angular.
In this blog post will learn about Rate Limiting and how we can implement it in Asp.net Core Minimal API.
Rate Limiting
What is it?
Rate limiting is the process of limiting how much a resource can be accessed. In the APIs environment, we can define a rate limiter that allows 100 requests every minute and rejects any more requests until restarting the counter again.
How does it work?
Rate limiting is based on tracking the client IP where the requests are sent from and monitoring how much time elapses between each request.
The rate-limiting middleware measures the time between each request from the client IP and the number of requests within a specified rule. If the application gets too many requests from a single client IP in the defined period, the rate-limiting middleware will only allow the request from the client once the reset point is reached. Usually, this will be displayed in the response header to the client.
What are the benefits of using Rate Limiting?
Using rate limiting can motivate third-party developers to pay more to use our API(s).
Another benefit of implementing rate limiting is to protect our API against malicious bot attacks.
Implementation
First, it is necessary to install the nugget package AspNetCoreRateLimit. After we need to do some configurations:
// needed to store rate limit counters and ip rules
builder.Services.AddMemoryCache();

//load general configuration from appsettings.json
builder.Services.Configure<IpRateLimitOptions>(builder.Configuration.GetSection("IpRateLimiting"));

//load ip rules from appsettings.json
builder.Services.Configure<IpRateLimitPolicies>(builder.Configuration.GetSection("IpRateLimitPolicies"));

// inject counter and rules stores
builder.Services.AddInMemoryRateLimiting();

// configuration (resolvers, counter key builders)
builder.Services.AddSingleton<IIpPolicyStore, MemoryCacheIpPolicyStore>();
builder.Services.AddSingleton<IRateLimitConfiguration, RateLimitConfiguration>();
To use the middleware, we should use the following code. We need to register the middleware before any other components.
app.UseIpRateLimiting();
We can add the rules in the appsettings.json file. The following code shows a basic sample of rules.
  "IpRateLimitingSettings": {
    "EnableEndpointRateLimiting": true,
    "StackBlockedRequests": false,
    "RealIpHeader": "X-Real-IP",
    "ClientIdHeader": "X-ClientId",
    "HttpStatusCode": 429,
    "GeneralRules": [
      {
        "Endpoint": "*",
        "Period": "10s",
        "Limit": 5
      }
    ]
  }
Let's understand the rules that were defined in the appsettings file.
EnableEndpointRateLimiting is set to false, and then the limits will apply globally, and only the rules that have as endpoint * will apply. For example, if we put a limit of five calls per ten seconds, any HTTP call to any endpoint will count towards that limit. If set to true, the client can call {HTTP_METHOD}{PATH} five times per ten seconds for each HTTP method (GET, POST, PUT, DELETE).
If StackBlockedRequests is set to false, rejected calls are not added to the throttle counter. If a client makes three requests per second and we've selected a limit of one call per second, other limits like per minute or per day counters will only record the first call, which wasn't blocked. If we want rejected requests to count toward the other limits, we must set StackBlockedRequests to true.
The RealIpHeader extracts the client IP when your Kestrel server is behind a reverse proxy. If the proxy uses a different header, then X-Real-IP uses this option to set it up.
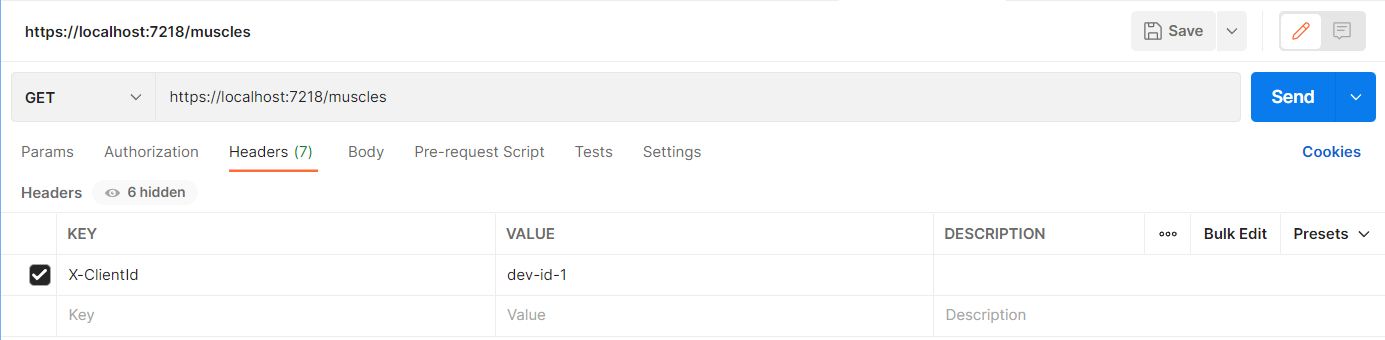
The ClientIdHeader is used to extract the client id for whitelisting. If a client id is present in this header and matches a value specified in ClientWhitelist, then no rate limits are applied.
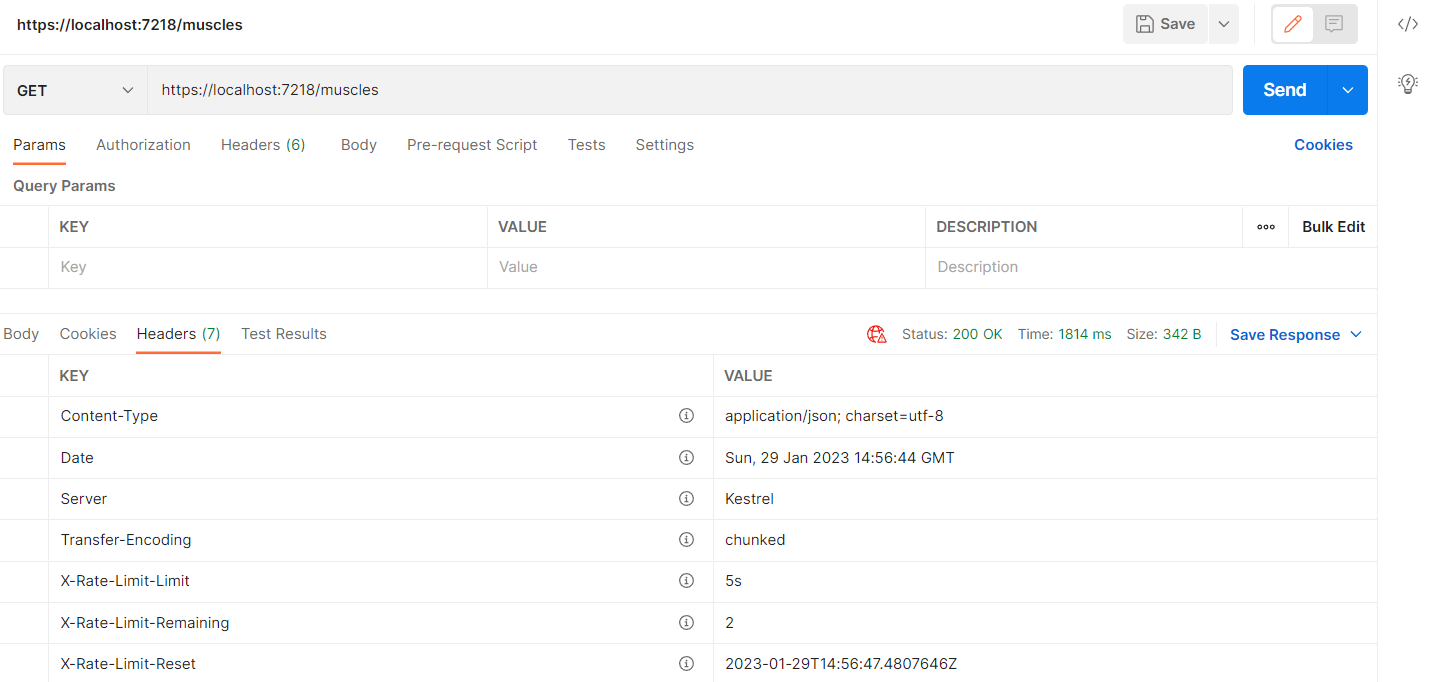
The rate limit values are displayed in the headers when an endpoint is called.
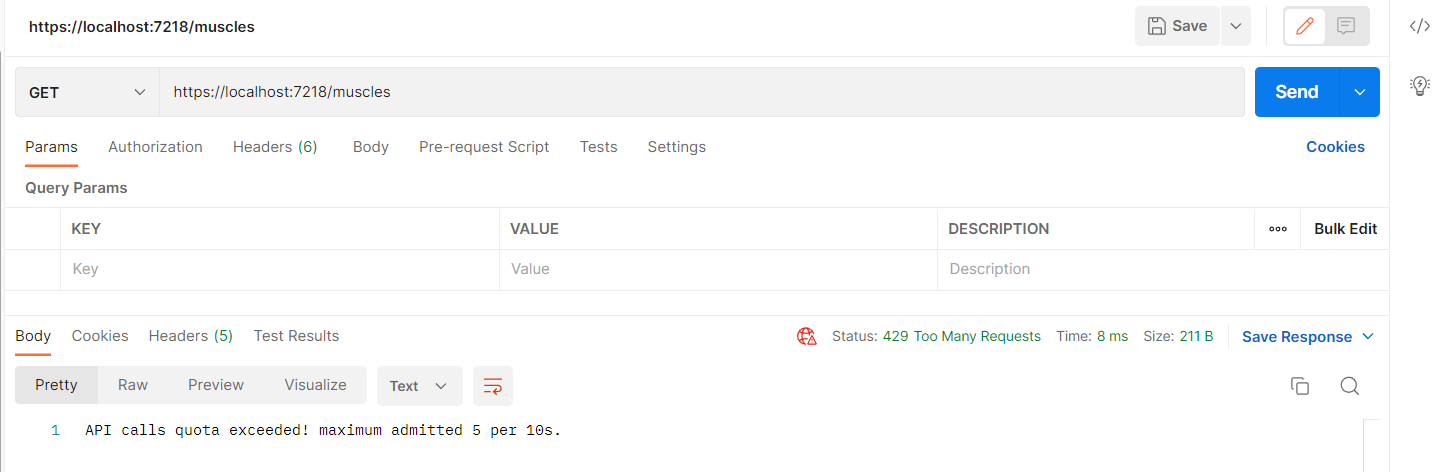
The following image shows the results when the client exceeds the limit of calls.
Rate Limit General Rules
We can have multiple rules in our application, changing the endpoint, period and limit. We've defined in our settings for all the endpoints a limit of five calls in a period of ten seconds. The following code shows two rules for all the endpoints but with different limits and periods. The behaviour will depend on the property StackBlockedRequests if rejected calls are added or not to the throttle counter.
    "GeneralRules": [
      {
        "Endpoint": "*",
        "Period": "10s",
        "Limit": 5
      },
      {
        "Endpoint": "*",
        "Period": "10m",
        "Limit": 100
      }
    ]
We also can define different settings per endpoint.
"GeneralRules": [
      {
        "Endpoint": "get:/muscles",
        "Period": "5s",
        "Limit": 3
      },
      {
        "Endpoint": "get:/muscles/*",
        "Period": "1m",
        "Limit": 10
      },
      {
        "Endpoint": "post:/muscles",
        "Period": "1m",
        "Limit": 3
      }
    ]
The EndpointWhitelist property is used to define the endpoints with no limitations.
"EndpointWhitelist": [ "get:/license", "*:/status" ],
We can use the ClientWhitelist property to define the list of X-ClientId values with no limitations in calling the endpoints. For this, the X-ClientId should be present in the headers.
"ClientWhitelist": [ "dev-id-1", "dev-id-2" ],
Overriding General Rules
The general rules can be overridden using the IpRateLimitPolicies settings. The IP field supports IP v4 and v6 values and ranges like 192.168.0.0/24, fe80::/10 or 192.168.0.0-192.168.0.255.
To load the IpRateLimitPolicies, the following code should be registered.
builder.Services.Configure<IpRateLimitPolicies>(builder.Configuration.GetSection("IpRateLimitPolicies"));

builder.Services.AddSingleton<IIpPolicyStore, MemoryCacheIpPolicyStore>();
"IpRateLimitPolicies": {
    "IpRules": [
      {
        "Ip": "84.247.85.224",
        "Rules": [
          {
            "Endpoint": "*",
            "Period": "1s",
            "Limit": 10
          },
          {
            "Endpoint": "*",
            "Period": "15m",
            "Limit": 200
          }
        ]
      },
      {
        "Ip": "192.168.3.22/25",
        "Rules": [
          {
            "Endpoint": "*",
            "Period": "1s",
            "Limit": 5
          },
          {
            "Endpoint": "*",
            "Period": "15m",
            "Limit": 150
          },
          {
            "Endpoint": "*",
            "Period": "12h",
            "Limit": 500
          }
        ]
      }
    ]
  }
Client Rate Limiting
We can have all the configurations we saw for the IP Rate for the Client Rate, so instead of creating settings for the IP address, we will use ClientId.
// configure client rate limiting middleware
builder.Services.Configure<ClientRateLimitOptions>(builder.Configuration.GetSection("ClientRateLimiting"));
builder.Services.Configure<ClientRateLimitPolicies>(builder.Configuration.GetSection("ClientRateLimitPolicies"));
  "ClientRateLimiting": {
    "EnableEndpointRateLimiting": true,
    "ClientIdHeader": "X-ClientId",
    "HttpStatusCode": 429,
    "EndpointWhitelist": [ "*:/api/values", "delete:/api/clients", "get:/" ],
    "ClientWhitelist": [ "cl-key-a", "cl-key-b" ],
    "GeneralRules": [
      {
        "Endpoint": "*",
        "Period": "1s",
        "Limit": 2
      },
      {
        "Endpoint": "*",
        "Period": "1m",
        "Limit": 5
      },
      {
        "Endpoint": "post:/muscles",
        "Period": "5m",
        "Limit": 3
      },
    ]
  },

  "ClientRateLimitPolicies": {
    "ClientRules": [
      {
        "ClientId": "cl-key-1",
        "Rules": [
          {
            "Endpoint": "*",
            "Period": "1s",
            "Limit": 10
          },
          {
            "Endpoint": "get:/muscles",
            "Period": "1m",
            "Limit": 2
          },
          {
            "Endpoint": "put:/muscles",
            "Period": "5m",
            "Limit": 2
          }
        ]
      },
      {
        "ClientId": "cl-key-2",
        "Rules": [
          {
            "Endpoint": "*",
            "Period": "1s",
            "Limit": 10
          },
          {
            "Endpoint": "get:/muscles",
            "Period": "1m",
            "Limit": 0
          },
          {
            "Endpoint": "post:/muscles",
            "Period": "5m",
            "Limit": 50
          }
        ]
      },
      {
        "ClientId": "cl-key-3",
        "Rules": [
          {
            "Endpoint": "post:/muscles",
            "Period": "1s",
            "Limit": 3
          }
        ]
      }
    ]
  }
Custom Rate Limit configuration
The AspNetCoreRateLimit middleware supports customization in case we want to use a different header or the value we want to configure is present in the query.
For example, for this call, https://localhost:7218/muscles?X-ClientId=dev-id-1, even having the dev-id-1 value as ClientWhitelist, the middleware would not apply the setting because it is expecting it as a header.
To customize, first, we need to create a class that inherits from RateLimitConfiguration class and then create another class that implements the interface IClientResolveContributor so we can get the value from the query parameters. We also need to add it in the ClientResolvers property of CustomRateLimitConfiguration class.
public class CustomRateLimitConfiguration : RateLimitConfiguration
{
    public CustomRateLimitConfiguration(IOptions<IpRateLimitOptions> ipOptions, IOptions<ClientRateLimitOptions> clientOptions) : base(ipOptions, clientOptions)
    {
    }

    public override void RegisterResolvers()
    {
        base.RegisterResolvers();
        ClientResolvers.Add(new QueryStringClientIdResolveContributor());
    }
}

public class QueryStringClientIdResolveContributor : IClientResolveContributor
{
    public Task<string> ResolveClientAsync(HttpContext httpContext)
    {
        return Task.FromResult<string>(httpContext.Request.Query["X-ClientId"]);
    }
}
To finalize, we need to tell the application to use our custom implementation.
//builder.Services.AddSingleton<IRateLimitConfiguration, RateLimitConfiguration>();
builder.Services.AddSingleton<IRateLimitConfiguration, CustomRateLimitConfiguration>();
Wrapping Up
In this link, you can see that built-in Rate Limiting support is now part of .NET 7.
You can find the complete code on my GitHub.