Creating a custom authentication handler with Asp.Net Core Minimal APIs

I am an enthusiastic software developer focusing on C#, .NET, Asp.NET, Azure and Angular.
In this article I created a custom middleware for securing an Api. For this one let's change the implementation using a custom authentication handler.
Authentication
Authentication is the process that helps identify who are the users. The API authentication process validates the identity of the client attempting to make a connection by using an authentication protocol.
After the user is authenticated the authorization process starts. It is necessary user’s identity to identify the role of a user and act accordingly.
Authentication scheme
Authentication schemes provide a way to collect credentials and determine the identity of a user and is useful as a mechanism for referring to the authentication, challenge, and forbid behaviors of the associated handler.
During authentication, Web Agents communicate with the Policy Server to determine the proper credentials that must be retrieved from a user who is requesting resources.
Authentication schemes are registered inside of the ConfigureServices method. It happens by calling the AddAuthentication method on the IServiceCollection instance passed to the method. It can register multiple authentication schemes, whereas only one of them will be a default scheme
Authentication handler
Authentication handlers can be created implementing the interface IAuthenticationHandler or deriving from AuthenticationHandler. Its primary responsibility is to authenticate users based on the authentication scheme's configuration and the incoming request context.
It is common to have a custom logic for authenticating a user inside of the handler.
It should return:
'no result' or 'failure' if authentication is unsuccessful.
'success' if authentication is successful
Implementation
This implementation will be based in Basic Authentication, having a user model and a service to help in the authentication process.
Context and UserService
The model is to represent the user. A new property was added to the Context allowing user's data to be saved and retrieved from the database through the UserService. The service will be used in the endpoint and in the AuthenticationHandler.
public class User
{
    public int Id { get; set; }
    public string FirstName { get; set; }
    public string LastName { get; set; }
    public string Username { get; set; }
    public string Password { get; set; }
}
public class TodoDb : DbContext
{
    public TodoDb(DbContextOptions<TodoDb> options)
        : base(options) { }

    public DbSet<Todo> Todos => Set<Todo>();
    public DbSet<User> Users => Set<User>();
}
    public interface IUserService
    {
        Task<User> Authenticate(string username, string password);
        Task<IEnumerable<User>> GetAll();
        Task Save(User user);
    }

    public class UserService : IUserService
    {
        private readonly TodoDb _dbContext;

        public UserService(TodoDb todoDb)
        {
            this._dbContext = todoDb;
        }

        public async Task<User> Authenticate(string username, string password)
        {
            var user = await Task.Run(() => _dbContext.Users.SingleOrDefault(x => x.Username == username && x.Password == password));

            return user;
        }

        public async Task<IEnumerable<User>> GetAll()
        {
            return await _dbContext.Users.ToListAsync();
        }

        public async Task Save(User user)
        {
            _dbContext.Users.Add(user);
            await _dbContext.SaveChangesAsync();
        }
    }
Custom Authentication Scheme
Creating a custom authentication handler requires an AuthenticationSchemeOptions implementation. So this custom authentication scheme is to specify the scheme that will be used, for now it just derives from AuthenticationSchemeOptions.
public class CustomBasicAuthenticationSchemeOptions : AuthenticationSchemeOptions
{
}
Custom Authentication Handler
The validations will be inside of the method HandleAuthenticateAsync. The first validation is to check if it contains the Authorization header. After that, the header value will be parsed and the username and password will be obtained from it. The UserService class will be used to authenticate the user.
At the end the claims will be created and then passed over an AuthenticationTicket so the middleware can continue with the execution of the pipeline.
 public class CustomBasicAuthenticationHandler : AuthenticationHandler<CustomBasicAuthenticationSchemeOptions>
    {
        private readonly IUserService _userService;

        public CustomBasicAuthenticationHandler(IUserService userService,
                                                IOptionsMonitor<CustomBasicAuthenticationSchemeOptions> options,
                                                ILoggerFactory logger,
                                                UrlEncoder encoder,
                                                ISystemClock clock) : base(options, logger, encoder, clock)
        {
            _userService = userService;
        }

        protected override async Task<AuthenticateResult> HandleAuthenticateAsync()
        {
            if (!Request.Headers.ContainsKey(Constants.AuthorizationHeaderName))
            {
                return AuthenticateResult.Fail("Header Not Found.");
            }

            var headerValue = Request.Headers[Constants.AuthorizationHeaderName];

            User? user = null;
            try
            {
                var authHeader = AuthenticationHeaderValue.Parse(headerValue);
                var credentialBytes = Convert.FromBase64String(authHeader.Parameter);
                var credentials = Encoding.UTF8.GetString(credentialBytes).Split(new[] { ':' }, 2);
                var username = credentials[0];
                var password = credentials[1];
                user = await _userService.Authenticate(username, password);
            }
            catch
            {
                return AuthenticateResult.Fail("Invalid Authorization Header");
            }

            if (user == null)
                return AuthenticateResult.Fail("Invalid Username or Password");

            var claims = new[] {
                new Claim(ClaimTypes.NameIdentifier, user.Id.ToString()),
                new Claim(ClaimTypes.Name, user.Username),
            };
            var identity = new ClaimsIdentity(claims, Scheme.Name);
            var principal = new ClaimsPrincipal(identity);
            var ticket = new AuthenticationTicket(principal, Scheme.Name);

            return AuthenticateResult.Success(ticket);
        }
    }
Registering
The following code registers the custom authentication handler and the custom authentication scheme.
builder.Services.AddAuthentication("BasicAuthentication")
    .AddScheme<CustomBasicAuthenticationSchemeOptions, CustomBasicAuthenticationHandler>("BasicAuthentication",null);
builder.Services.AddAuthorization();
And also needs to be added before app.UseHttpsRedirection();
app.UseAuthentication();
app.UseAuthorization();
Endpoints
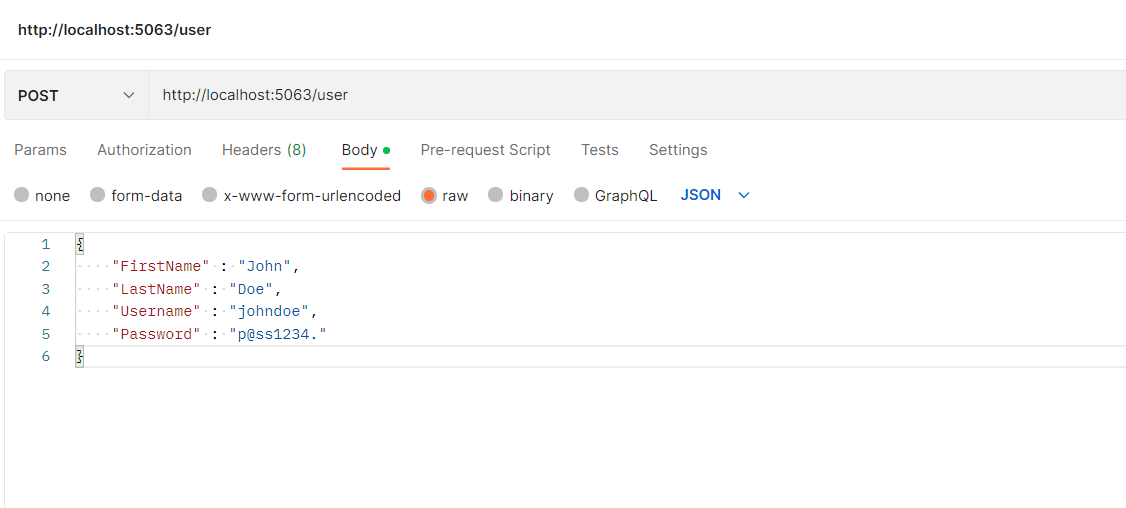
It was added a new endpoint to add new users.
app.MapPost("/user", async (IUserService userService, User user) =>
{
    await userService.Save(user);

    return Results.Created($"/users/{user.Id}", user);
});
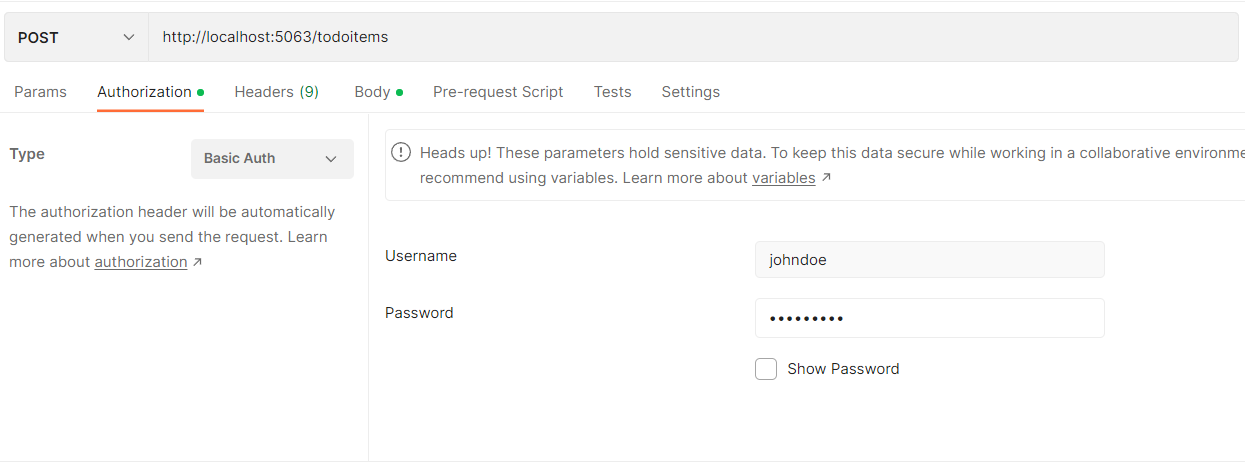
To add authorize requirements to the endpoints is necessary to decorate them using the [Authorize] attribute.
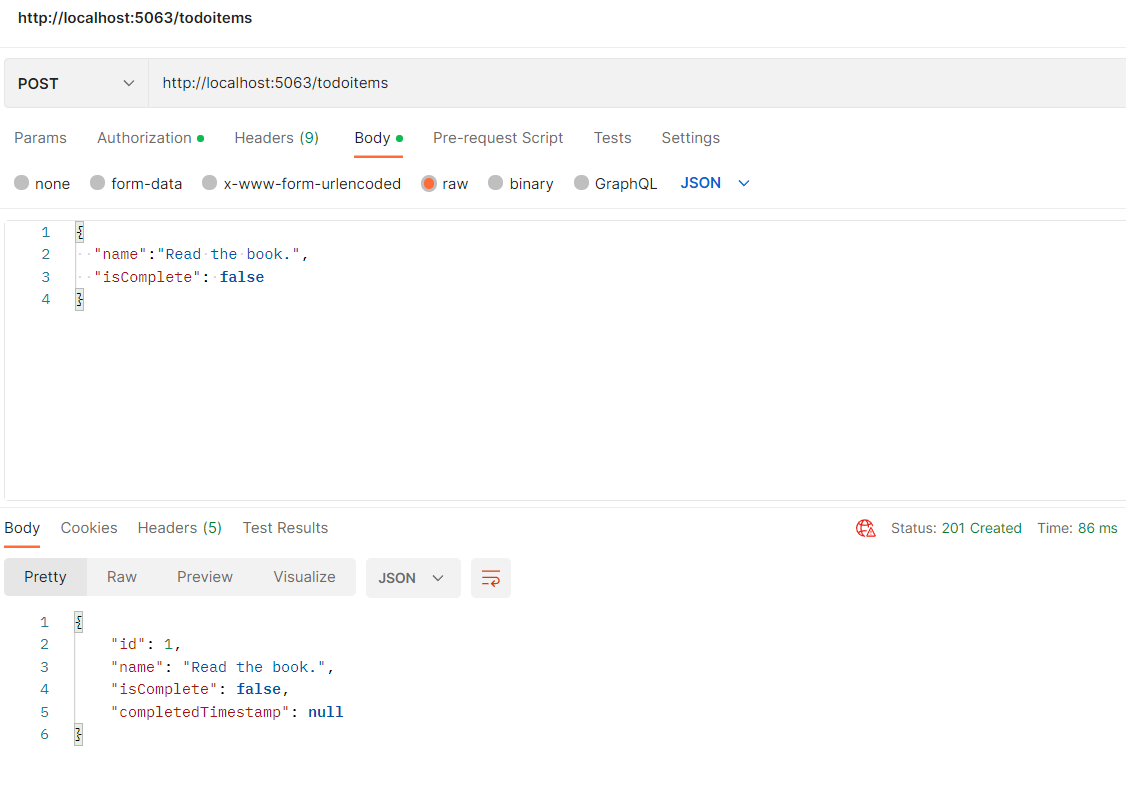
app.MapPost("/todoitems", [Authorize]  async (IValidator<Todo> validator, Todo todo, TodoDb db) =>
{
    ValidationResult validationResult = await validator.ValidateAsync(todo);

    if (!validationResult.IsValid)
    {
        return Results.ValidationProblem(validationResult.ToDictionary());
    }

    db.Todos.Add(todo);
    await db.SaveChangesAsync();

    return Results.Created($"/todoitems/{todo.Id}", todo);
});
Testing
The following images are showing the user being created, the basic authentication being added to the endpoint and the todoitem being created successfully.
Wrapping Up
This is just a simple example of how to customize the authentication handler and authentication scheme.
There are things that could be improved such as: username and password being encrypted and using a better solution for authenticating the user.
You can find the full code on my GitHub.